On previous post, I've explained how to delete cells shift to left and up, now i will explain how to delete entire row or entire column:
To delete entire row:
Sub deleteShiftLeft()
Thisworkbook.Activesheet.Range("B10").EntireRow.Delete
End Sub
To delete entire column:
Sub deleteShiftUp()
Thisworkbook.Activesheet.Range("B10").EntireColumn.Delete
End Sub
That's all. Fin.
Showing posts with label Excel VBA Macro Tutorial. Show all posts
Showing posts with label Excel VBA Macro Tutorial. Show all posts
Saturday, November 7, 2015
Excel VBA: How To Delete Cell Shift Up and Shift Left
It's very simple to delete cell using VBA, we can use Delete method. This is an example how to do it:
Delete cell shift to left:
Sub deleteShiftLeft()
Thisworkbook.Activesheet.Range("B10").Delete Shift:=xlToLeft
End Sub
Delete cell shift up:
Sub deleteShiftUp()
Thisworkbook.Activesheet.Range("B10").Delete Shift:=xlUp
End Sub
Fin.
Delete cell shift to left:
Sub deleteShiftLeft()
Thisworkbook.Activesheet.Range("B10").Delete Shift:=xlToLeft
End Sub
Delete cell shift up:
Sub deleteShiftUp()
Thisworkbook.Activesheet.Range("B10").Delete Shift:=xlUp
End Sub
Fin.
Excel VBA: How to check whether a sheet exist or not
Sometimes we need to check whether a sheet exist or not to avoid run time error. Below is a simple function to do that task:
Function isSheetExist(ByVal workbookName As String, ByVal sheetName As String) As Boolean
Dim ws As Worksheet, ss
Dim vbR As Boolean
vbR = False
Set ss = Workbooks(workbookName).Worksheets
For Each ws In ss
If (ws.Name = sheetName) Then
vbR = True
Exit For
End If
Next ws
isSheetExist = vbR
End Function
And this is an example to use that function:
Function isSheetExist(ByVal workbookName As String, ByVal sheetName As String) As Boolean
Dim ws As Worksheet, ss
Dim vbR As Boolean
vbR = False
Set ss = Workbooks(workbookName).Worksheets
For Each ws In ss
If (ws.Name = sheetName) Then
vbR = True
Exit For
End If
Next ws
isSheetExist = vbR
End Function
And this is an example to use that function:
Sub FunctionTest() IfisSheetExist(ThisWorkbook.Name, "Sheet1") = False Then MsgBox "Sheet is not exist." Else MsgBox "Sheet is exist." End If End Sub
Excel VBA: Connect to Microsoft Access Database (MDB) using ADODB
First, you have to enable Microsoft ActiveX Data Object Library. Follow this instruction:
1. Open Visual Basic for Application, click Tools, then click Add References

2. Search for Microsoft ActiveX Data Object Library

This is an example code to connect to ADODB:
Private Sub CommandButton1_Click()
Dim adoConn As New ADODB.Connection
Dim adoRS As New ADODB.Recordset
adoConn.ConnectionString = "Provider=Microsoft.Jet.OLEDB.4.0;Data Source=test.mdb; Persist Security Info=False"
adoConn.Open
adoRS.Open "SELECT COUNT([employee_id]) AS empID FROM [Table1]", adoConn, adOpenKeyset, adLockOptimistic
ActiveSheet.Range("A1").Value = adoRS!empID
If adoRS.State = adStateOpen Then adoRS.Close
If adoConn.State = adStateOpen Then adoConn.Close
End Sub
Sunday, December 27, 2009
Excel VBA: Find And Replace String Using VBA Code
There are several ways to replace string using VBA code, by looping each cell or by using VBA Replace function.
Let's say that we want to replace "Macrosoft Excel" with "Microsoft Excel" from A1 through A500.
This first example loops from A1 through A500 and replace "Macrosoft Excel" with "Microsoft Excel".
The following example is more efficient than previous example:
If you to make the search case sensitive you can change the MatchCase property to true. And also if you want to replace data that contain part of the searched data you can change the LookAt property to xlPart.
Related posts:
If you like posts in this blog, you can to support me :)
Let's say that we want to replace "Macrosoft Excel" with "Microsoft Excel" from A1 through A500.
This first example loops from A1 through A500 and replace "Macrosoft Excel" with "Microsoft Excel".
Sub Find_Replace1()
    Dim I As Integer
    Dim SFind As String
    Dim SReplace As String

    SFind = "Macrosoft Excel"
    SReplace = "Microsoft Excel"
    For I = 1 To 500
        If Cells(I, 1).Value = SFind Then
            Cells(I, 1).Value = SReplace
        End If
    Next I
End Sub
The following example is more efficient than previous example:
SubFind_Replace2() Dim SFind As String Dim SReplace As String SFind = "Macrosoft Excel" SReplace = "Microsoft Excel" Range("A1:A500").Replace _ What:=SFind, Replacement:=SReplace, _ LookAt:=xlWhole, MatchCase:=False End Sub
If you to make the search case sensitive you can change the MatchCase property to true. And also if you want to replace data that contain part of the searched data you can change the LookAt property to xlPart.
Related posts:
- Excel VBA Macro Examples: Function Procedure
- Excel VBA Macro Examples: Sub Procedure
- Excel VBA Macro Tutorial: Range Objects
- Excel VBA Macro Tutorial: Controlling Execution
If you like posts in this blog, you can
to support me :)
Thursday, March 5, 2009
Excel VBA: Cell Alignment
In Excel VBA macro we can control the alignment of cell, both horizontally and vertically. To change alignment, we can use the following properties of the Range object:
Related Post:
---
If you like posts in this blog, you can to support me :)
- HorizontalAlignment. Set to xlLeft, xlCenter, xlRight, xlDistributed, or xlJustify.
- VerticalAlignment. Set to xlTop, xlCenter, xlBottom, xlDistributed, or xlJustify.
Worksheets("Sheet1").Range("A1:D5").HorizontalAlignment = xlJustifyRelated Post:
---
If you like posts in this blog, you can
to support me :)
Tuesday, March 3, 2009
Excel VBA: Font Formatting
When we working in Excel, if we want to changes font properties we may use Font tab in the Format Cells dialog box. In Excel VBA, we control the font's appearance by the Font object. The Font object have several properties that correspond to various aspects of the font's appearance. Here are several list of font's properties:
This example sets font name of range A1:B4 to Tahoma in ActiveSheet in ActiveWorkbook:
The Color property uses an RGB value, which identifies a color in terms of its red, green,
and blue components. To set this property, use the RGB function:
The next example sets font color of range B4 to Blue in ActiveSheet in ActiveWorkbook:
We can also use predefined constants to sets font color, they are vbBlack, vbRed, vbGreen, vbYellow, vbBlue, vbMagenta, vbCyan, and vbWhite.
This example do exactly as previous example:
Related Post:
---
If you like posts in this blog, you can to support me :)
| Property | Description |
| Name |
The name of the font.
|
| Bold | True if the font is bold. Read/write Variant. |
| Italic | True if the font style is italic. Read/write Boolean. |
| Underline | Returns or sets the type of underline applied to the font. Can be set to xlUnderlineStyleNone, xlUnderlineStyleSingle, xlUnderlineStyleDouble, xlUnderlineStyleSingleAccounting, xlUnderlineStyleDoubleAccounting. Read/write Variant. |
| Size | Returns or sets the size of the font. Read/write Variant. |
| Subscript | True if the font is formatted as subscript. False by default. Read/write Variant. |
| Superscript | True if the font is formatted as superscript; False by default. Read/write Variant. |
| Strikethrough | True if the font is struck through with a horizontal line. Read/write Boolean. |
This example sets font name of range A1:B4 to Tahoma in ActiveSheet in ActiveWorkbook:
ActiveWorkbook.ActiveSheet.Range("A1:B4").Font.Name = "Tahoma"The Color property uses an RGB value, which identifies a color in terms of its red, green,
and blue components. To set this property, use the RGB function:
RGB(r, g, b)The next example sets font color of range B4 to Blue in ActiveSheet in ActiveWorkbook:
ActiveWorkbook.ActiveSheet.Range("A1:B4").Font.Color = RGB(0, 0, 255)We can also use predefined constants to sets font color, they are vbBlack, vbRed, vbGreen, vbYellow, vbBlue, vbMagenta, vbCyan, and vbWhite.
This example do exactly as previous example:
ActiveWorkbook.ActiveSheet.Range("A1:B4").Font.Color = vbBlueRelated Post:
---
If you like posts in this blog, you can
to support me :)
Monday, March 2, 2009
Excel VBA: Changing Row and Column Size
Sometimes, in Microsoft Excel we need to change width of columns or height of rows in a worksheet to accomodate data they contain. In Excel Visual Basic for Application (VBA macro), to change columns width we can use ColumnWidth property. Following excel macro code sets width of column C in "Sheet1" worksheet to 24:
To change columns width to fit data in columns, we can use AutoFit method. The following example uses AutoFit method to change the size of C:F in the "Sheet1" worksheet:
RowHeight property is used to change rows height of a range. For example:
Related Post:
---
If you like posts in this blog, you can to support me :)
Sheets("Sheet1").Columns("C").ColumnWidth = 24To change columns width to fit data in columns, we can use AutoFit method. The following example uses AutoFit method to change the size of C:F in the "Sheet1" worksheet:
Sheets("Sheet1").Columns("C:F").AutoFitRowHeight property is used to change rows height of a range. For example:
Sheets("Sheet1").Rows(2).RowHeight = 56Related Post:
---
If you like posts in this blog, you can
to support me :)
Sunday, March 1, 2009
Excel VBA: Number Formatting in Excel VBA Macro
Number formatting controls how numbers on cells are displayed, it has no effect on cells that contain text. In Microsoft Excel, if we want to apply number formatting we can use Format Cells dialog box. To format numbers in VBA macro we can use the NumberFormat property. Following are some number formatting codes to format numbers.
Number Formatting Codes
Here is the example VBA code to display numbers with no commas or special characters, and no decimal places:
We can display positive and negative numbers differently. Following number format code will display negative numbers in red color.
To specify a display color, include the color name enclosed in square brackets at the start the format code. The available color names are:
---
If you like posts in this blog, you can to support me :)
Number Formatting Codes
| Character | Meaning | Code example | Format example |
| # | Significant digit | ##.# | 10.78 displays as 10.9 |
| 0 | Nonsignificant 0 | #.00 | 5.4 displays as 5.40 |
| . | Decimal point | ##.## | 14.55 displays as 14.55 |
| $ | Currency symbol | $#.## | 56.78 displays as $56.78 |
| % | Percent symbol | #.#% | 0.075 displays as 7.5% |
| , | Thousands separator | #,### | 123000 displays as 123,000 |
Here is the example VBA code to display numbers with no commas or special characters, and no decimal places:
Sub NumFormat()
 Range("A1").NumberFormat = "0"
End Sub
We can display positive and negative numbers differently. Following number format code will display negative numbers in red color.
#.##;[Red]#.##To specify a display color, include the color name enclosed in square brackets at the start the format code. The available color names are:
- Black
- Blue
- Cyan
- Green
- Magenta
- Red
- White
- Yellow
---
If you like posts in this blog, you can
to support me :)
Friday, February 27, 2009
Excel VBA: Protecting Excel VBA Macro Code
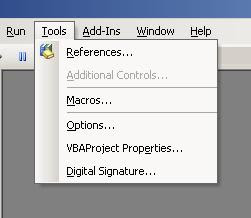
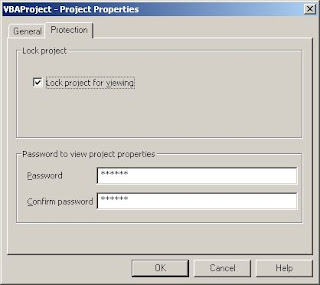
When we working with Excel VBA macro, sometimes we need to protect our VBA macro code. So nobody can change or modify VBA macro that we have create. Here are steps to protect VBA Project:
Related Post:
---
If you like posts in this blog, you can to support me :)
- Go to Visual Basic Editor by pressing Alt+F11 key.
- In menu toolbar, click Tools -> VBAProject Properties...

- In VBAProject - Properties dialog box, click Protection tab, and then check Lock project for viewing checkbox.

- Enter desired password to protect VBA project, then click OK button.
- Save the VBA project.
Related Post:
---
If you like posts in this blog, you can
to support me :)
Saturday, February 21, 2009
Excel VBA: The InputBox Function
In Microsoft Excel VBA Macro, to obtain a single input from the user, we can use the InputBox function.
The InputBox function is useful for obtaining a single input from the user. Here is the InputBox function syntax:
The arguments:
The following is an example of how to use the InputBox function:
Related posts:
The InputBox function is useful for obtaining a single input from the user. Here is the InputBox function syntax:
InputBox(prompt[,title][,default])The arguments:
- prompt: Required. Text that is displayed in the input box.
- title: Optional. Text that appears in the input box’s title bar.
- default: Optional. The default value.
The following is an example of how to use the InputBox function:
Sub AskUserName
ActiveSheet.Range("A1").Value = InputBox("Your name?","Input Name")
End Sub
Related posts:
- The MsgBox Function
- Excel VBA Macro Examples: Sub Procedure
- Excel VBA Macro Tutorial: Range Objects
- Excel VBA Macro Tutorial: Controlling Execution
--- If you like posts in this blog, you can
Thursday, February 19, 2009
Excel VBA: The MsgBox Function
In Excel VBA macro, if we want display a message to the user, we can use the MsgBox function. The syntax for the MsgBox function is as follows:
The MsgBox function returns an integer value that identifies the button the user selected
to close the dialog box.
Here is an example of using MsgBox funtion:
Related posts:
If you like posts in this blog, you can to support me :)
MsgBox(prompt, buttons, title, helpfile, context)| prompt | Required. String expression displayed as the message in the dialog box. The maximum length of prompt is approximately 1024 characters, depending on the width of the characters used. If prompt consists of more than one line, you can separate the lines using a carriage return character (Chr(13)), a linefeed character (Chr(10)), or carriage return – linefeed character combination (Chr(13) & Chr(10)) between each line. |
| buttons | Optional. Numeric expression that is the sum of values specifying the number and type of buttons to display, the icon style to use, the identity of the default button, and the modality of the message box. If omitted, the default value for buttons is 0. |
| title | Optional. String expression displayed in the title bar of the dialog box. If you omit title, the application name is placed in the title bar. |
| helpfile | Optional. String expression that identifies the Help file to use to provide context-sensitive Help for the dialog box. If helpfile is provided, context must also be provided. |
| context | Optional. Numeric expression that is the Help context number assigned to the appropriate Help topic by the Help author. If context is provided, helpfile must also be provided. |
The buttons argument settings are:
| Constant | Value | Description |
|---|---|---|
| vbOKOnly | 0 | Display OK button only. |
| vbOKCancel | 1 | Display OK and Cancel buttons. |
| vbAbortRetryIgnore | 2 | Display Abort, Retry, and Ignore buttons. |
| vbYesNoCancel | 3 | Display Yes, No, and Cancel buttons. |
| vbYesNo | 4 | Display Yes and No buttons. |
| vbRetryCancel | 5 | Display Retry and Cancel buttons. |
| vbCritical | 16 | Display Critical Message icon. |
| vbQuestion | 32 | Display Warning Query icon. |
| vbExclamation | 48 | Display Warning Message icon. |
| vbInformation | 64 | Display Information Message icon. |
| vbDefaultButton1 | 0 | First button is default. |
| vbDefaultButton2 | 256 | Second button is default. |
| vbDefaultButton3 | 512 | Third button is default. |
| vbDefaultButton4 | 768 | Fourth button is default. |
| vbApplicationModal | 0 | Application modal; the user must respond to the message box before continuing work in the current application. |
| vbSystemModal | 4096 | System modal; all applications are suspended until the user responds to the message box. |
| vbMsgBoxHelpButton | 16384 | Adds Help button to the message box |
| VbMsgBoxSetForeground | 65536 | Specifies the message box window as the foreground window |
| vbMsgBoxRight | 524288 | Text is right aligned |
| vbMsgBoxRtlReading | 1048576 | Specifies text should appear as right-to-left reading on Hebrew and Arabic systems |
to close the dialog box.
| Constant | Value | Description |
|---|---|---|
| vbOK | 1 | OK |
| vbCancel | 2 | Cancel |
| vbAbort | 3 | Abort |
| vbRetry | 4 | Retry |
| vbIgnore | 5 | Ignore |
| vbYes | 6 | Yes |
| vbNo | 7 | No |
Here is an example of using MsgBox funtion:
Sub ShowMsgBox() Dim response As Integerresponse= MsgBox("Do you want to continue?", vbYesNo + vbQuestion) Ifresponse= vbYes Then Range("A1").Value = "'Yes' button clicked." ElseRange("A1").Value = "'No' button clicked."End If End Sub
Related posts:
- Excel VBA Macro Examples: Sub Procedure
- Excel VBA Macro Tutorial: Range Objects
- Excel VBA Macro Tutorial: Controlling Execution
If you like posts in this blog, you can
to support me :)
Wednesday, February 11, 2009
Excel VBA Macro Tutorial: Excel's Event
An event handler procedure is a specially named procedure that's executed when a specific event occurs. Following are examples of types of events that Excel can recognize:
Excel's events can be classified as the following:
Event-handling procedures should be placed in the correct location. If the procedure is placed in the wrong location, it does not respond to its event even though it is named properly. Here are some guidelines:

Following example will puts word "Excel VBA Macro" when worksheet activated:
Related post: Excel VBA Macro Tutorial: Sub procedure
- A workbook is opened or closed
- A worksheet is activated or deactivated
- An object is clicked
- A worksheet is changed
- A workbook is saved
- A new workbook is created
- A window is activaed or deactivated
- A window is resized
- A new worksheet is added
Excel's events can be classified as the following:
- Workbook events. Events that occur for a particular workbook. Examples for this events are Open, Close, and BeforeSave.
- Worksheet events. Events that occur for a particular worksheet. Examples include Change, and SelectionChange.
- Chart events. Events that occur for a particular chart. Examples include Select.
- Application events. Events that occur for a particular the application (Excel itself).
- UserForm events. Events that occur for a particular UserForm or an object that contained on the UserForm. For example Click event.
- Events not associated with objects. For examples OnTime and OnKey events.
Event-handling procedures should be placed in the correct location. If the procedure is placed in the wrong location, it does not respond to its event even though it is named properly. Here are some guidelines:
- Event procedures for a user form (and its controls) should always go in the user
form module itself. - Event procedures for a workbook, worksheet, or chart should always be placed in
the project associated with the workbook. - If the object and the event can be found in the object and event list at the top of
the editing window, it is all right to place the procedure in the current module. - Never place event procedures in a code module (those project modules listed under
the Modules node in the Project window).

Following example will puts word "Excel VBA Macro" when worksheet activated:
Private Sub Worksheet_Activate()
  ActiveSheet.Cells(1, 1).Value = "Excel VBA Macro"
End Sub
Related post: Excel VBA Macro Tutorial: Sub procedure
Subscribe to:
Posts (Atom)